
VLANs are one of the simplest ways to make a small business network safer and smoother. They let you split one physical network into separate logical networks, so guests and IoT devices don’t mingle with servers and staff PCs. That separation reduces broadcast noise and limits lateral movement during incidents.
In this guide, you’ll learn what VLANs do, how to plan zones, how trunks and tagging work, and how to validate the setup so it performs as intended.
What a VLAN Actually Does
A VLAN splits one physical network into separate logical networks (broadcast domains). That reduces unnecessary traffic and limits who can reach what by default. Instead of every device seeing the same broadcasts, each VLAN keeps local chatter contained.
That’s the performance win: fewer broadcasts and less congestion. It’s also the security win: network segmentation isolates traffic, so a guest laptop can’t automatically “see” servers. VLANs don’t encrypt traffic, but they create clean boundaries.
Those boundaries make least-privilege networking possible. Teams often start by understanding the benefits of VLAN, then mapping them to real zones and rules.
Plan First: Build 4–6 “Zones” That Match Real Risk and Workflows
Good VLANs start with grouping systems by trust level and purpose. For example, guests and IoT devices shouldn’t sit in the same network as servers or finance PCs. Planning first prevents messy networks later. Keep the number of zones small, but meaningful.
Each zone should have a clear reason to exist. Ask, “What could be harmed if this segment is compromised?” Also ask, “Which systems truly need to talk to each other?” That’s how you design for least privilege.
Write down the allowed traffic between zones before touching switches. This becomes your rulebook for inter-VLAN routing and ACLs. It also reduces troubleshooting during deployment.
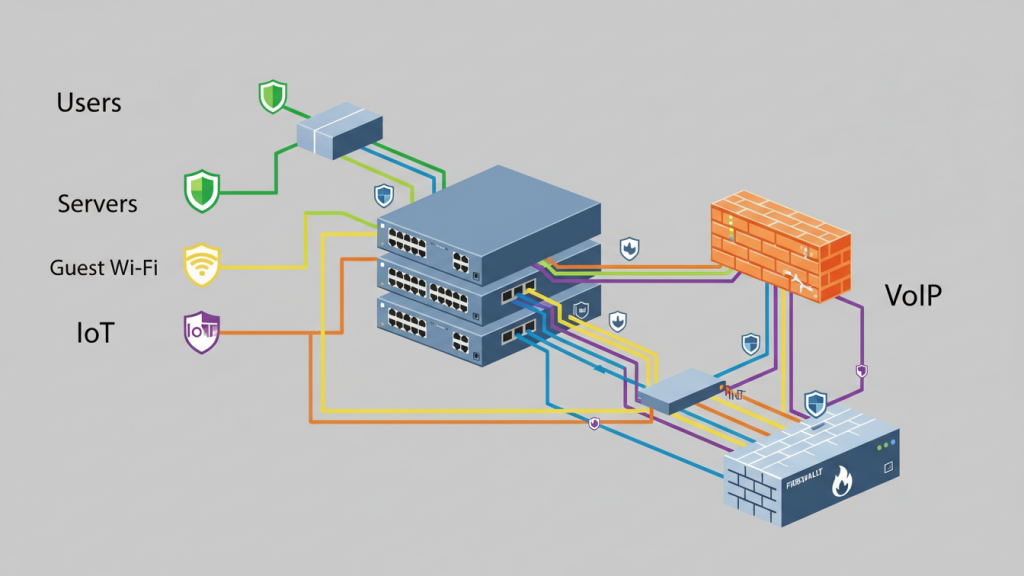
Common VLAN Zones for Small Businesses
User VLAN for employee PCs and laptops. Server VLAN for core services and storage. Guest VLAN for visitor Wi-Fi.
VoIP VLAN for phones and voice gateways. IoT VLAN for cameras, TVs, and smart devices. Management VLAN for switch, AP, and firewall admin access.
The Core Build: Access Ports, Trunks, and 802.1Q Tagging
Most endpoints plug into access ports (one VLAN), while links between switches use trunks (many VLANs). 802.1Q is the standard that tags frames so switches know which VLAN traffic belongs to.
In practice, you assign each endpoint port to a VLAN. You then carry multiple VLANs across uplinks using trunk ports. Finally, you keep your VLAN-to-subnet plan consistent across switches, DHCP, and gateways.
Use an allowed VLAN list on trunks to prevent accidental sprawl. Also define your native VLAN intentionally. Avoid leaving defaults in place. A clean core build makes routing, security rules, and troubleshooting far easier later.
Access ports vs trunk ports (what goes where)
Use access ports for end devices like PCs, printers, and phones. Each access port belongs to one VLAN. Use trunk ports between switches, firewalls, and some access points.
Trunks carry multiple VLANs over one link. Keep trunks only where needed. Document which VLANs are allowed on each trunk. That prevents leaks and reduces attack surface.
What 802.1Q tagging means in practice
802.1Q adds a VLAN tag to Ethernet frames. Switches read that tag to keep traffic separated. Access ports usually send untagged frames into their assigned VLAN. Trunk ports carry tagged frames for multiple VLANs.
The native VLAN is the untagged VLAN on a trunk. Native VLAN mismatches cause weird outages. Best practice is to avoid using VLAN 1 and avoid broad native VLAN usage. Keep allowed VLAN lists tight. Tag only what you must carry.
Make VLANs Useful: Inter-VLAN Routing and “Default-Deny” Traffic Rules
Devices in different VLANs can’t talk unless you route between them. That’s a feature—because you can control inter-VLAN access with simple rules and allow only what’s needed.
Without routing, segmentation is strict but not practical. With routing, you get controlled connectivity. Start with a default-deny mindset for east-west traffic. Then allow specific flows, like users to a file server.
Block guest and IoT access to servers. Allow management access only from trusted admin devices. Keep rules readable and documented. VLANs become valuable when routing and ACLs enforce real boundaries.
Two common designs: Layer-3 switch vs “router-on-a-stick”
A Layer-3 switch can route between VLANs at high speed. It’s common in larger LANs. Router-on-a-stick routes VLANs through one router or firewall interface. It uses subinterfaces and trunking.
This is common in smaller networks. Firewalls add stronger security controls than basic switch routing. Choose based on throughput needs and policy complexity.
Where the Performance Gains Come From
VLANs help performance by keeping broadcast traffic contained and separating busy device groups. For voice/video, you can also prioritize certain traffic classes using tagging and QoS features.
Broadcast reduction lowers noise on each segment. That can improve responsiveness on larger networks. Separating IoT devices also prevents chatty devices from hurting users. For VoIP, a voice VLAN plus QoS reduces latency and jitter.
Many setups use 802.1p priority (PCP) markings for voice frames. QoS won’t fix a saturated internet circuit, but it helps inside the LAN. The biggest win comes from clean segmentation plus sensible prioritization.
VLAN Security Hardening Checklist
VLANs don’t automatically secure a network—you still need to enforce boundaries. Start by disabling unused switch ports, restricting trunks to required VLANs, and applying ACLs between VLANs.
This prevents accidental access and reduces attack paths. Also lock down management access to network devices. Use strong passwords, MFA where possible, and centralized logging. Avoid placing critical services in the same VLAN as users. Don’t allow “any to any” rules between zones.
VLAN hopping is rare in well-managed networks, but weak trunking practices raise risk. Security comes from segmentation enforcement, not from VLAN IDs alone. Treat the switch like a security device, not just plumbing.
Lock down unused ports and limit what trunks carry
Disable unused ports and place them in a dead VLAN. Turn on port security features where supported. Limit trunks to an allowed VLAN list. Avoid “allow all VLANs” on uplinks. Set an intentional native VLAN and keep it consistent.
Disable auto-trunking features if possible. Document trunk endpoints and VLAN membership. These steps stop many accidental exposures.
Control inter-VLAN access with ACLs
Use ACLs or firewall rules to enforce least privilege. Start with default deny between user, IoT, and server VLANs. Allow only required ports and destinations. Permit DNS and DHCP where needed.
Allow user VLAN to application servers, not to everything. Block guest VLAN from internal networks entirely. Log denied traffic during rollout. Then adjust rules based on real needs.
Validate and Troubleshoot: The 6 Checks That Confirm Your VLAN Design Works
Most VLAN issues come down to tagging, trunks, or gateways. A quick validation checklist—DHCP per VLAN, gateway reachability, and trunk allowed lists—catches the common failure points early.
First, confirm each VLAN has the right subnet. Second, confirm DHCP scope per VLAN and correct relay settings.
Third, confirm the gateway IP is reachable from each VLAN. Fourth, confirm trunk ports carry the required VLANs only.
Fifth, check for native VLAN mismatch across trunk endpoints. Sixth, test a simple ping path: client → gateway → DNS → app server. If any step fails, check tagging and port assignment first.
Wrap-Up
VLANs are about smart separation. Plan zones first, based on risk and workflows. Implement 802.1Q trunks correctly and keep allowed VLAN lists tight. Route between VLANs only when needed, using default-deny rules. Add ACLs and port hygiene so segmentation is real. Done well, VLANs improve both security and performance.